

Dallas150
-
Posts
12 -
Joined
-
Last visited
-
Days Won
2
Dallas150's Achievements

Newbie (1/14)
-
 Rare
Rare
-
 Rare
Rare
-
-
-
 Rare
Rare
Recent Badges
-
Double Horn Honk disable BCM 726-41-02 xxx0 xxxx xxxx
-
Have you tried calling a local dealer with the PN listed? Not sure why it doesn't show up online anymore, but if there has been an update to the part, your local dealer should be able to see what the new part number is based on the old.
-
Apple Car play usb upgrade, 2016 MKX
Dallas150 replied to Pete T's topic in Accessories & Modifications
Hi Neel2004, Yes I am still on this forum, though I sometimes don't get notified when there is activity, so usually only catch these when I have time to check back on the forums. Part number should be a single USB port, though some stock photos may show it as it having 2 ports, like the F150. This is the part I purchased for my 2016 MKX- HA1Z-19A387-AC. As for turn by turn from CarPlay or Android Auto, no this does not come up of the gauge cluster, only on the Sync screen. -
Yes, there is a thread about this. I have a detailed write-up on what is needed and how to do it. 4G modem Hope this helps.
-
2016 Lincoln MKX Park Brake Issue
Dallas150 replied to Meetch72's topic in Brakes, Chassis, Park Assist & Suspension
Little late on the response to this question, but if you haven't sorted it out already, it is/was probably the wiring harnesses that lead to each EPB motor. One on each side, and are a little over a foot long if memory serves. I also have a 2016 and had to do this on mine as I had one side fail and the other was on its way. Cause is corrosion in the wiring harness. Seems to seep down the wires and eventually they will break. Also had this happen to the front camera harness. -
Not sure if you found the problem, I don’t have much insight to your problem but I will suggest checking out the Ford edge forums. They are frequented by more users and the vehicles are very much the same and use many of the same parts and are afflicted by many of the same problems. I also have a 2016 MKX and generally find more info there than on this one. Though I do check in every now and then. PS. The under dash fuse box is a PIA even for a 40yo lol. Not sure what genius came up with that location.
-
 VBBoston reacted to a post in a topic:
4g Modem replacement
VBBoston reacted to a post in a topic:
4g Modem replacement
-
 Laminar reacted to a post in a topic:
4g Modem replacement
Laminar reacted to a post in a topic:
4g Modem replacement
-
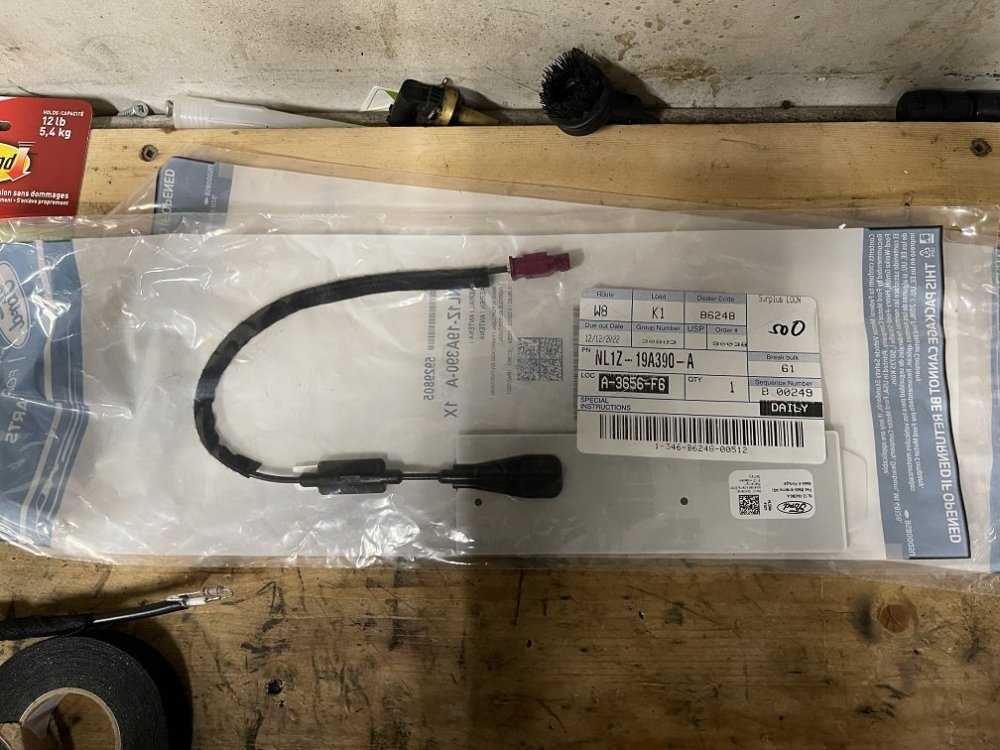
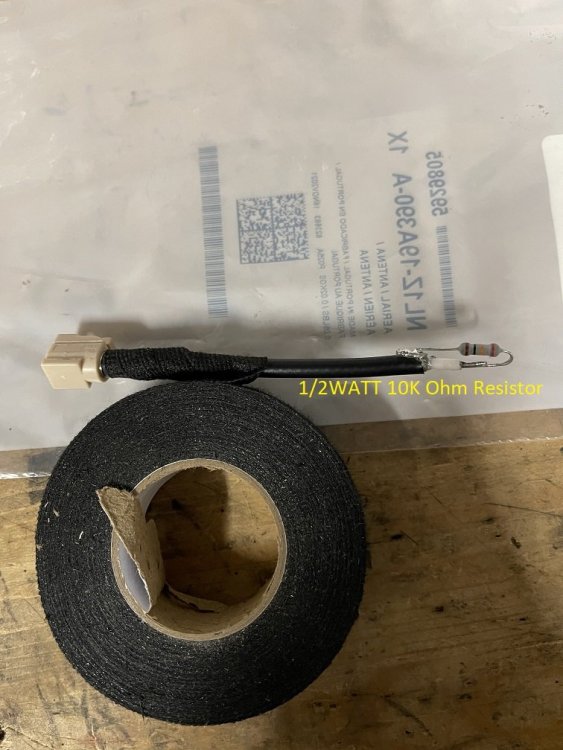
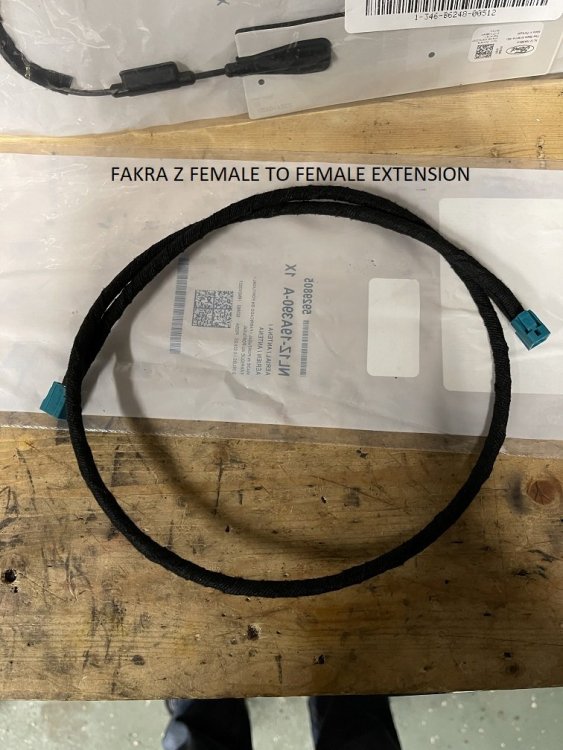
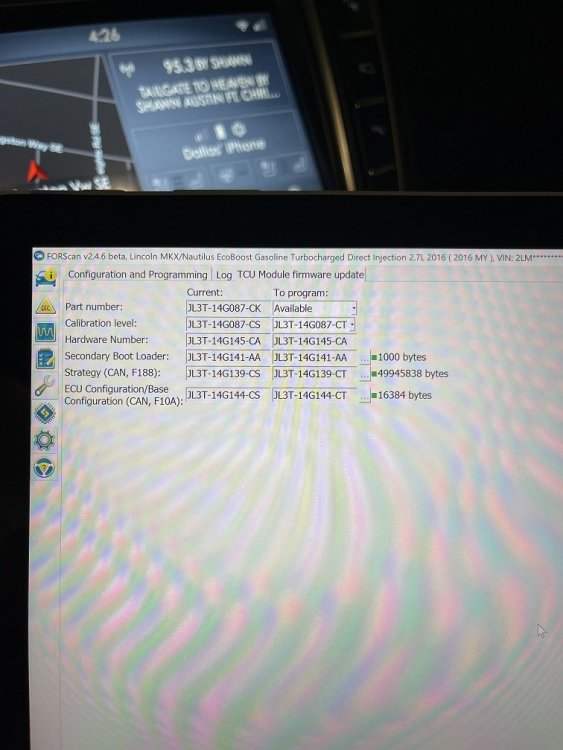
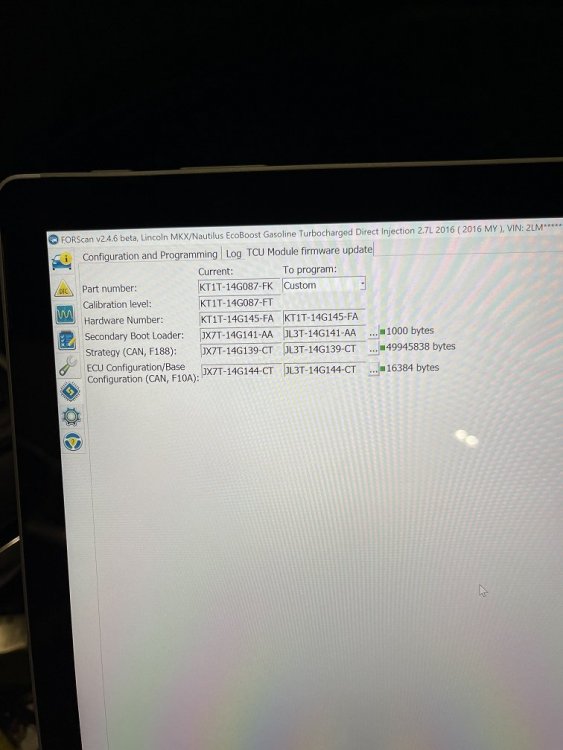
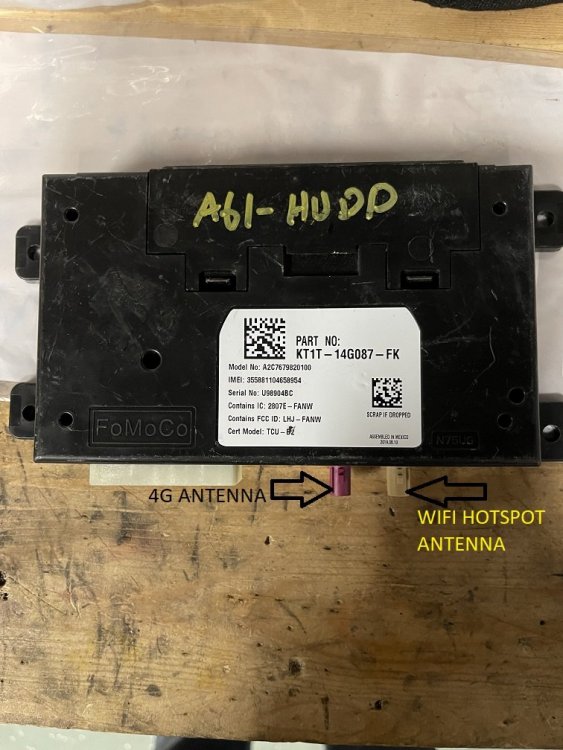
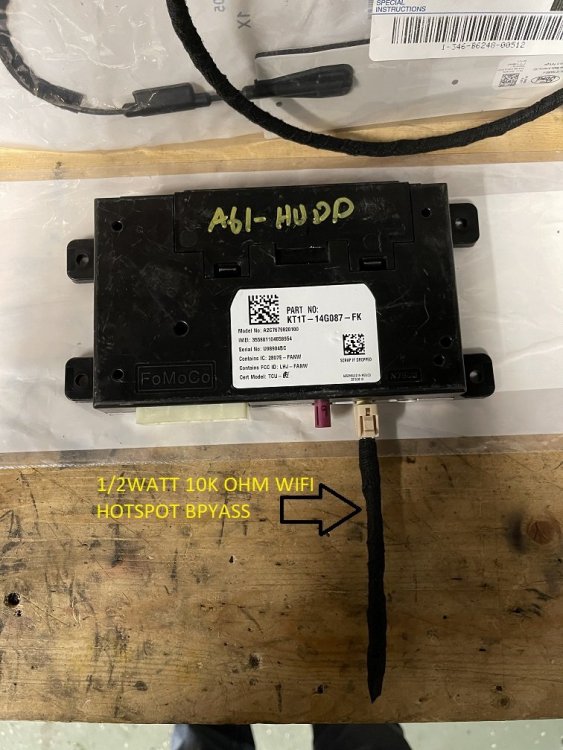
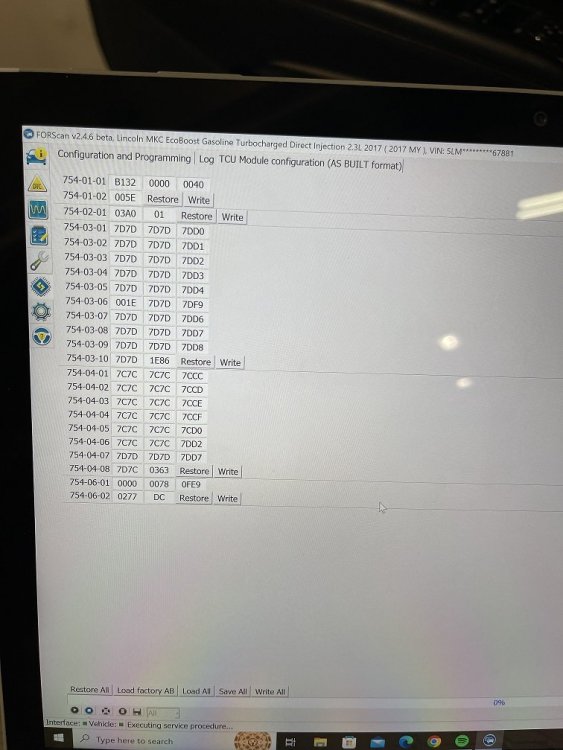
Finally got all my parts together to complete this 3G to 4G upgrade and I can say it worked out well for both my 2016 MKX as well as my 2017 MKC. The parts I used are below and should apply to any one upgrading from 3G to 4G, the only difference would be the length of the antenna extension cable. In the MKX the TCU is located in the right rear quarter panel just to the left of the subwoofer as shown in earlier posts in this thread. The MKC TCU is located under the center console, accessible from the passenger side foot well area. These were both installed following the guidelines setout in the ford bulletin HERE. Hopefully this plus all the other info out there can help someone else get this feature working again. This can be done for much less than what dealers are charging just for labor, provided they are willing to do it or know anything about it. Total costs for this upgrade was around $200 CAD per vehicle, TCUs were $130, antennas were $52 and extension cables were $20. The install was as follows: Step 1: Remove old TCU located to the top left of the subwoofer in the right rear quarter. Should be noted that the original module electrical connections faced the rear of the vehicle and the new/repurposed TCU faces the front of the vehicle (per the guide). For me this caused the wiring harness to be too short to reach without cutting back the taped main harness and pulling the TCU wiring out a bit more. It will reach but it was tight. Step 2: Temporarily Plug the factory harness into the new/repurposed TCU, connect FAKRA type I (beige) bypass plug (if not using wifi hotspot), connect the 4G antenna and extension harness. This will all be kind of just dangling as you verify functionality. Make sure everything works as expected before going through all the effort of finishing the install. Step 3: Connect to vehicle using FORScan. I didn't reuse a previous profile, I just connected as if it were the first time and allowed FORScan to scan for all modules. The TCU should get recognized during the scan. After the scan is completed open the PID tab on the left and select the TCU from the menu at the bottom, then add all available TCU functions to the monitor. This will allow you to see signal strength and the status of the module among other things. You can push play and see what the status of these are which will allow you to see that everything is reading, once everything is good push the stop button as you can't run 2 functions at the same time (next step). Ensure you have decent cellular strength or the authorization steps may not work. (mine was around 175-180). Step 4: Open the configuration tab on the left and scroll down to the TCU module asbuild data section and run it. Once open we will be changing the last character of the first block on the first line 754-01-01. The code will be xxxX-xxxx-xxxx. We will be changing the "X" from what ever it is (Likely a 2) to a 3 and clicking on write. After this has been written and the prompts followed we are going to go and change that 3 back to what it was previously and click write. This forces the TCU to reprovision itself. You can now stop this function and go back to the PID section and monitor the TCU again. This time you will see "Unprovsioned mode" and the other values will be zeros. Let this run until it reads "Waiting for authorization". The TCU is now waiting for the request to come from the phone app. Step 5: Do a factory reset on the Sync 3 screen in settings-general-Factory reset. This will remove all previously authorizations. Unfortunately this will also reset your sound settings, radio presets, possibly ambient light setting, bluetooth devices and wifi network. Not a big deal, this can all be changed back, just a heads up. Step 6: Open the Lincoln way app or Ford pass app and delete your vehicle if you haven't already. Now click "add" or the "+" and add your vehicle using the vin, either add manually or click the camera button and scan the bar code on the sticker located in the drivers door jam. It should say "searching" followed by "vehicle found", then add a nickname and continue. Once added go to the "Home" screen on the app, you should now see an "Activate" button. Click this button and it should send the request to the car, watch the Sync screen for the authorization popup and click allow. You will then be notified in the app that permission has been granted. It can take a second for the vehicle to update. If you look at the PID monitor in FORScan (which should still be running) you will see the "Waiting for authorization" change to "Authorized". Once that happens you should now see your vehicle on the home screen in the app with the remote functions. Tire pressures and oil life may only update after the first drive cycle. Step 7: Test the functions of the app. Unlock, lock, and remote start. If these are all working then you can now permanently install the TCU and antenna and put the vehicle back together. After everything is back together, plug back in and run the PID in FORScan. This is just a double check that everything is still working after it was installed. DONE!! This was easier than I was expecting and worked out well in both vehicles but there are a few things worth mentioning; If using a TCU the starts with a "K" instead of a "J" you will likely need to change the Calibration level and configuration files to the earlier "J" versions in order to get it to work. I can't say for sure if this is needed as I just did it without trying it first to see if it was necessary. From what I've read it will need to be done, especially if the donor TCU is from something a lot newer. The issue is that some of the newer TCUs have more lines in the asbuild which can cause some errors in the TCU as it will be looking for information from other sources that don't exist. Downgrading them basically changes them back to modules that don't have these extra lines and therefore no errors. The reflash took about 50min or so to complete (its a large file). The pics below are of the "K" TCU original files and what they were changed to and the "J" type TCU which I changed nothing on. As you can see I change the "K" TCU to match the files on the "J". These files were still available on the ford site as of December 16, 2022. You can save yourself any questions by purchasing a TCU from a vehicle that is the same as what you are trying to modify ie. 2016 MKX get a TCU from a 2018 MKX or 2017 F150 get a TCU from a 2018 F150. The 2018 TCUs should be "J" and will more or less be plug and play. The easiest way to identify a TCU that will work for the 4G upgrade is to look for both the purple and beige antenna connectors. There are some single purple connector TCUs out there which should work for the upgrade but I can verify for sure if they do or not. Here is a link for some TCU calibration files in the event the Ford site stops working or stops listing them. TCU Calibration files Note: Only paid versions of FORScan running v2.4.6 beta (or a 2.4.x version) will be able to flash firmware, the trail version doesn't have this ability. Also note that flashing firmware is not without risk, bricking modules can happen especially if not using quality ELM OBD interfaces. FORScan recommends OBDlink. Not that it cant be done with the cheaper ELMs you just run a greater risk. OBDlink adapters will also automatically switch between HS and MS can, no need for the fancy switch on the side. For the "K" TCU, after it was flashed with the new files I reload the asbuild file I saved from the "J" TCU. Below is the asbuild list that came with the "J" TCU. I didn't reload a newer MXX asbuild into this as it wasn't necessary, this file worked in both the MKC and MKX. -4G antenna- Ford part - NL3Z-19A390-A. This is the flexible antenna used in the Ford 4G upgrade kit that no one seems to know anything about. -4G TCU - Ford part# JL3T-14G229-AK (from 2018 F150 installed in MKX) as well as KT1T-14G087-FK (from 2019 Edge installed in MKC) -Fakra type D or Z Female to Female extension cable. Fakra Z (water blue) connectors are universal and can plug into any Fakra type connector. I chose to use Z type but the actual connector for the 4G port is Fakra D (Bordeaux Violet ). I had these made locally as they could deliver sooner than I could order but they are available. MKX was 12" (1foot) long and MKC was 60" (5feet) long. -Fakra type I (beige) female 4" long whip with a 10kohm resistor soldered between the coax and the cable shield. As these TCUs are wifi hotspot enabled, this is used to simulate the wifi antenna in order to keep the TCU from flagging a code from an open port. I was not interested in the hotspot so built this to simulate the wifi antenna.

-
Hello all, I am acquiring all the parts to complete this 4G upgrade on a 2016 MKX and 2017 MKC. For those interested the 4G antenna that is part of Fords official upgrade kit is P/N: NL1Z-19A390-A , I can confirm that this is the white flexible antenna pad with a Male Fakra D lead coming off of it as pictured in the ford bulletin and the dealer sells these for about $50 CAD. In order to connect this to the TCU you will require a Fakra D (purple ends) or Fakra Z (water blue ends) female to female extension cable. Both the TCU and Fords antenna have male ends. The Fakra Z type cable is universal and will plug into any Fakra type end, the Fakra D will only plug into the ends on the TCU and antenna. These cables can be found on eBay or Amazon and you will need to order which ever length you require for your specific application. For the MKX a 12" (1 Foot) cable should be sufficient if using the suggested locations listed in the ford procedure located Here . Both the antenna listed above and the TCUs are made by continental. Also as others have stated it is definitely easier if you can find a TCU out of the exact same model you are trying to upgrade, however this isn't required. That said you will require a paid version of Forscan in order to change the firmware in the TCU to match your application and will also require it in order to downgrade the firmware. If those who have completed this upgrade could post the firmware versions that worked on their specific applications as well as the as-build data that would be very helpful for those wondering what files they will need or should show once they connect. A few have posted successes but not what files they used to get there. I will be attempting to use a TCU from a 2018 F150 and one from a 2019 Edge. Though the prefixes and suffixes are different than the ones that come out of an MKX or Nautilus once installed I should be able to reflash the firmware to the correct versions that would apply to an MKX and MKC and load the factory as-build data from 2018 versions of each. These files are still available from ford and FORScan will also have them. Waiting on my extension cables before I get started, but once I do I will post exactly what needed to be done in order to get these to work.
-
For those curious with 2016 MKXs, a firmware update to your IPC (Gauge cluster) will give you the centre digital speedometer. https://forscan.org/forum/viewtopic.php?f=16&t=17941
-
CARR142 reacted to a post in a topic:
Tire Pressure Monitor Fault
-
Hello all, I too had this “Tire Pressure Monitor Fault”, thanks to NOTMY911 for posting this issue and the part number. Unfortunately for me I was 3k km out of my warranty so had to fix this issue myself. For those of you that are in the same boat, this is a very easy fix to do your self. No special tools required, though you will have to retrain your tire pressure sensors after module replacement, this process can be found in your manual or online. There is a tool to aid in training the sensors (8C2Z-1A203-A or TPMS-19) Though this can be done by releasing air on each tire as indicated on your instrument cluster. This RTM (Radio transceiver Module- FL3Z-15607-L) is located under the headliner at the centre rear of the vehicle. Accessible by removing the weather stripping around the rear door/hatch and by pulling down on the headliner, the headliner is secured with magnets and guide pins so no worry about breaking clips. You will see this module attached to the headliner itself about 8-10” in and centred. It sits in a bracket so the retaining clips will need to be released. Once released on the side facing you the module can be rolled up to release the front retaining clips, then unplug the old and plug in the new one and reinstall in the reverse of removal. Then push the headliner back into place and reinstall the weather strip. Then turn ignition on and start the tire pressure sensor training process in which ever method works for you. The horn will chirp when the training mode has been entered and when each wheel is learned. Once all 4 wheels are trained it must be driven for a few minutes in order for the pressure sensors to start transmitting to the module. Also note that some cheaper electronics like USB cell phone charge adapters can interfere with the signal coming from each tire and could also cause a fault. This happens because these type of cheap devices can transmit similar if not the same frequency as the tire sensors and the module doesn’t get the proper signal. Quality units are typically shield from this interference escaping the device. Hope this helps some of you avoid the dealer for this particular problem, simple as this fix is electrical related problems can be a cash grab for the dealers.
-
Apple Car play usb upgrade, 2016 MKX
Dallas150 replied to Pete T's topic in Accessories & Modifications
For those curious the part number the media hub that will enable Apple car play in sync 3 equipped 2016s is “HA1Z-19A387-AC”. As most have stated it can be tough to remove but a helpful tip it the retaining tabs are on the top and bottom. Quite a bit of force is required to get them to release. Don’t worry about breaking the media hub if you do as you are replacing it with a new one. This is a plug and play modification. -
First time poster in this forum. Been in the F150 forum for years. I figured I’d chime in here as this is very easy to do using forscan (free software) and an ELM OBD adapter which can be found quite cheap on Amazon. I prefer the USB version over wifi or Bluetooth as I don’t want any interruptions when communicating with the vehicle. You can find different things you can add or change on various user created forscan spread sheets. This is one. https://docs.google.com/spreadsheets/d/1yax6zfhZYj2joBczEeruqKh9X5Qhee3C0ngilqwTA7E/pubhtml?gid=0&single=true Always remember to create backups of the original module before changing any of the coding in case something goes wrong. If it does you can just reload the original and start over. This is very easy to do and quite safe so long as you understand what you are doing. There are YouTube videos that show how to work with the software as well. This can also be used as a code reader which is far more thorough than your standard plug in style OBD2 reader. It should be noted that Ford/Lincoln tends to use a lot of the same coding across their vehicle line ups, so you will see commonalities in the various codes. This specific request lives in the body control module or “bdycm”. (This applies to 2014 and newer, possible on older models but on a different line). You will be looking for line 726-41-02 this will have 3 banks of numbers next to it, each containing 4 numbers like: XXXX XXXX XXXX. These will be difference vehicle to vehicle but each has a purpose. In this case you will be changing the last number in the first group xxxX xxxx xxxx from a “1” (enabled) to a “0”(disabled). Then write the value, cycle ignition and magically you will no longer have the double horn honk. Hope this helps and didn’t confuse everyone lol.


